
How To Heat Press Patches On Hats – Step By Step Guide
How do you heat press patches on hats? Want to learn how? Step-by-step instructions will be provided in this article on how to heat press patches on hats.
In order to establish a successful clothing brand, you need to distinguish your products from the competition. Adding unique and beautiful patches to your hats is one way to accomplish this. Starting a clothing line requires spreading the word about your brand and giving people something visible to remember you. To learn how to heat press patches on hats, keep reading.
Here Are The 5 Best Selling Hat Heat Press Machines This Year!
| Products | Ratings | Price |
|---|---|---|
| Cricut EasyPress Heat Machine For Hats | 9.9/10 [Editor's Choice] | Check Price |
| VEVOR Curved Element Heat Press for Hats | 9.8/10 | Check Price |
| Mophorn Hat Press Machine | 9.6/10 | Check Price |
| UOhost Hat Press Machine | 9.6/10 | Check Price |
| Fierton Heat Press Machine | 9.8/10 | Check Price |
What Are Patches On Hats?
A patch is a piece of fabric with a design or logo that is heat-pressed or sewn onto another piece of fabric. There are two main types of patches- sew-on and iron-on patches. The sew-on patches are sewn onto the fabric while the iron-on patches are applied with a hot iron or heat press to make them stick to the fabric. While the sew-on patch is used for fabrics that can’t withstand the heat, the iron-on patch is typically used for fabrics like baseball caps, beanies, and caps.
When adding patches to your hats, the most important thing is to make sure that the fabric used is heat resistant. This is because the patches need to be heated with a heat press to make them stick to the caps. If the fabric isn’t heat resistant, the heat can melt it, causing the patches to lose shape.
How To Heat Press Patches On Hats?
In this article, we’ll share the complete guide and materials you’ll need to heat press patches onto hats.
Materials Needed:
- Hat/Cap
- Hat Heat Press Machine
- Patch Design (You can make your own design with Glitter HTV/Flocked HTV or get ready-made designs)
- Heat Transfer Tape
- Teflon Sheet
- Silicon Sheet
Step-By-Step Guide:
The following steps will explain how you will heat press your patches onto hats/caps:
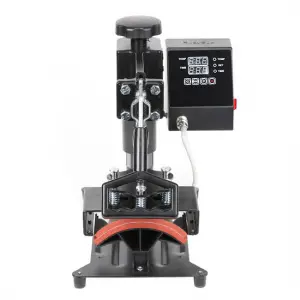
Step 1# Heat Your Hat Heat Press Machine
Get yourself a good hat heat press machine first.
This Hat Heat Press Machine Below Performs Exceptionally Well

Check Price on Amazon Check Price on Walmart
Set your machine’s temperature at 320 degrees Fahrenheit if your patch is made with Glitter HTV/Flocked HTV.
Credit: Madeinchina
Check out our article – 5 Best Hat Heat Press Attachments & Machines Review
Step 2# Place Flexible Finishing Sheet On The Silicon Pad
When you first put your cap on the silicon pad, it will form sharp edges and might leave marks on the cap when you heat press. That is why it is recommended to put a flexible finishing sheet on the silicon pad before placing your cap/hat.
Get High-Quality Silicon Sheet Here

Check Price on Amazon Check Price on eBay
The silicon sheet just needs to be folded up and placed on the silicon pad. We place this sheet below the cap to round the sharp edges of the platen (silicon pad) that might damage the design or leave marks on your fabric when pressed.
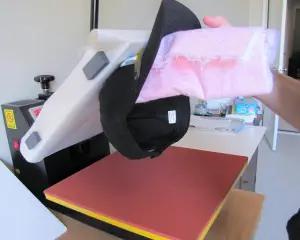
Step 3# Place The Hat/Cap On Top Of The Silicon Sheet
Now that you have placed the silicon sheet on the silicon pad, it is time to place your hat on top of the silicon sheet. There are several interchangeable curved platens available for hat heat presses. You don’t have to worry about manually manipulating your design because they can cover the entire surface at once. The method works on both hard and soft caps, regardless of whether wrinkles are present or not.
After placing your hat on top of the silicon sheet, you have to secure the hat on the platen. For this, you’ll have to press down the lever which is present under the silicon pad. Pressing it down will also lower a metal piece (under the silicon pad), pulling the cap’s strap under the metal piece. In this way, you will be able to tighten the cap and smooth out any wrinkles.
Note: Always remember when you are securing your cap between the silicon sheet and the metal piece, make sure not to squeeze the cap so tightly that the glue spills out the edges. You just have to make sure it’s a nice good flush pressed but not too tight.
In case you are using a flat press, the cap must be held in an oven mitt from the inside and pressed against the heated plate. In order to get the best results, press the middle of the cap first, followed by the sides.
Credit: Silhouetteschoolblog
Step 4# Pre-Heat The Cap/Hat
After you have secured your cap/hat on the silicon pad, now is the time to pre-heat the cap for at least 5 – 10 seconds.

Credit: Mostcraft
Step 5# Put Patch Design On Your Hat & Secure It
As you can see, the fabric is smooth and without wrinkles. The next step is to attach your patch design to the cap. Place the patch on the cap and secure it with heat transfer tape.
Credit: Silhouetteschoolblog
Here’s An Amazing Transfer Tape For Your Project

Check Price on Amazon Check Price on eBay
Once the patch design is applied, place a Teflon sheet over it.
This Teflon Sheet Below Is A Best-Seller

Check Price on Amazon Check Price on eBay
This Teflon sheet is a heat-resistant sheet that will protect your patch design.
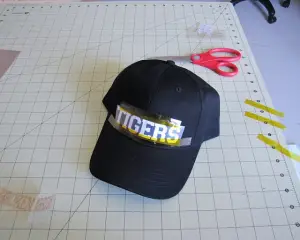
Step 6# Heatpress Your Hat Patch
The next step is to heat-press your hat patch design. Make sure the temperature is set to 320 degrees F and the time is set to 25 seconds on the machine.

Credit: Americanpatch
Once your patch design is in place, pull the press down and wait for 25 seconds. Remove your cap from the heat press after 25 seconds and allow it to cool. When you have removed the transfer tape, your cap is ready to wear with the beautiful patch design.
Credit: Graphicspro
See This YouTube Video Explaining How To Heat Press Leather Patches On Hats
FAQ’s
1- Which is the best heat press for hats?
Cricut EasyPress Heat Machine is one of the best hat heat press machines available on the market. Not only is it incredibly simple to use, but it is also highly effective for producing high-quality results for your projects. There are several amazing features in this machine that allows you to press a variety of different materials, including fabric hats. Hats, mittens, and other accessories can all be pressed on this machine in a matter of seconds.
2- At what temperature should hats be heated with a hat heat press?
You should heat your hat heat press to 320 degrees for 25 seconds when using Glitter HTV/Flocked HTV – but be sure to check the specifications of the brand you are using. If you’re going to apply sublimation to polyester hats such as the popular two-tone trucker hats, you must heat the hat press to 400 degrees for 1 minute.
3- What HTV is best for hats?
Flocked HTV and/or glitter HTV is the best heat transfer vinyl for hats. Because regular HTV is thinner, it may cause wrinkles on your hats when pressed, and the finished result may not be as smooth and polished as you’d like. Unlike the regular HTV, the flocked HTVs and glitter HTVs are quite a bit thicker and are very useful for covering up seams.
This Glitter HTV Below Is A Popular Choice Among Creators

Check Price on Amazon Check Price on eBay
Final Thoughts Adding patches to your hats is one way to make them stand out from the crowd and to let others know about your brand. Heat pressing patches on hats is easier and produces better results than ironing them on. Make sure you use heat-resistant fabrics for the patches, and you’re good to go. Thanks for picking out our tutorial; How To Heat Press Patches On Hats – Step By Step Guide. We hope it helps you in your purchasing decision.
Best Deals on Amazon
VEVOR Heat Press 6 x 3.75 Inch

Check Price on Amazon Check Price on eBay
SOROVEE Hat Press 6×3.5 Inch

Cricut Hat Press Machine
I specialize in writing tech-based product reviews for over 3 years now. My blogs aim to provide well-researched and informative content to help people make informed purchasing decisions.
